Overview
I’m in a learning mode picking up a lot of the ‘new’ stuff I have missed over the past few years. One area is all the new tooling like bower, yeoman, gulp and so. To a degree I’m skeptical that I need this stuff. I like writing PowerShell scripts or MSBuild scripts for most tasks that need to be automated. All the same: no reason not to at least look.
You can download all of the files from here
What is Gulp?
Gulp is described as a JavaScript task runner. What that really means is that they’ve build a tool on top of node.js that has plug-ins available that will allow you to work with files and do things to them. It also includes a file watcher that will run scripts in response to changes to the files it is watching.
The idea behind Gulp is to provide a build for your website. HTML, JavaScript and CSS on their own don’t require anything to be built, but if you are using any of the languages built on top of them (LESS, SASS, etc.) then you need something to ‘compile’ the file and output your CSS or JavaScript. You also might what your files minified which requires some processing.
In my case I use Visual Studio which handles nearly all this stuff for me. But not everybody has such an awesome tool at their disposal.
Get it setup so you can run it from PowerShell
Before going further I’ll point out that none of this is strictly necessary. Most of the time I work from Visual Studio which will process gulp files without any help. You could also save yourself some trouble and just fire up the old windows command prompt and live on happily. However, I’m all about automation. What if I want to use gulp as a part of an automated workflow I’ve scheduled via Windows Task Scheduler or some other scheduler? Most of my automation work is done via PowerShell. If you’ll bear with me a little this might make a little sense. Or not.
As already mentioned I primarily work from PowerShell so a little additional work is necessary to get things setup. The first task is to get node and npm on the workstation. Go to http://nodejs.org/ and install NodeJS (just click on the tile that matches your system). This will also install npm (node package manager). To verify that you’re ready to go, do the following:
Start PowerShell and at the command prompt type “node -v” this will show the version of Node.

Now type “npm -v” to see the version of Node Package Manager:

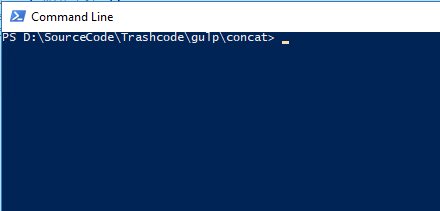
We are now ready to install gulp. To start with we’ll create a project. In my case I keep stuff like this in a folder called trashcode. So we’ll create a gulp folder to hold all of the experiments with gulp and then a project in there called concat. Like so:
Next we initialize npm by typing “npm -init” and answer the questions:

Notice that I change the entry point from “index.js” to “gulpfile.js”. I also provided a description to avoid the warning, if you’re not OCD you can leave description empty. You now see we have a package.json file in our directory.
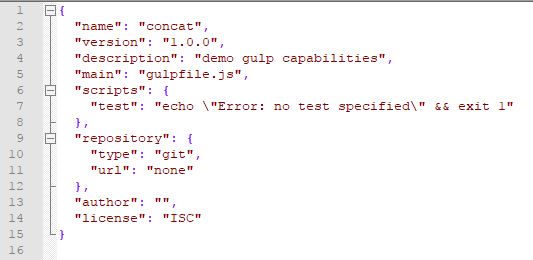
You don’t need to worry about this file. However, you’ll notice the repository settings won’t work very well. I’m not going to bother with them for now. Next, we’ll create a script to setup our project:

The first line installs gulp and the next two lines install two modules we’ll use in our first test. When you run the script you’ll see a bunch of status information as the components are installed. After it’s all done the directory will look like this:

You can explore node_modules to see what has been installed.
For our testing we’ll create additional directories and some test files:

All I want is some stuff to work with and that is what testSetup.ps1 provides. Now we will create gulpfile.js:
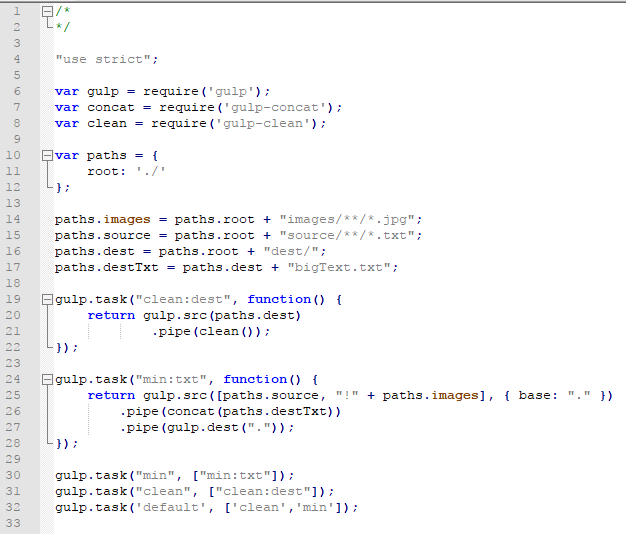
Here is what is going on:
Lines 6, 7, 8 tell node what packages we require and provide a short cut to access the modules.
Line 10 creates an object call paths that we will store values in.
Lines 14, 15, 16, and 17 store the paths we will work with in the paths object.
Line 19 creates a task called “clean:dest” that uses the gulp-clean module to delete files.
Line 24 creates a task called “min:txt” that uses the gulp-concat module to concatenate all the files together.
Line 30 and 31 setup tasks that can call multiple tasks. In this case if I had also created a min:images task I would make line 30 look like:

This would cause gulp to first call the task “min:txt” and then “min:images”.
The final task “default” first calls “clean” and then calls “min”. Clean deletes all the files in destination and min creates the new file and puts it in destination.
Now that we have our gulp file we can run it right? In a Visual Studio project, we’d be good to go. If you look inside node_modules in the gulp folder you’ll see “gulp.bat” and if you look at it in notepad you’ll see what is going on. To do the same in PowerShell, just create gulp.ps1 in the project directory.

At the command line if we run .\gulp.ps1 we’ll get the following results.
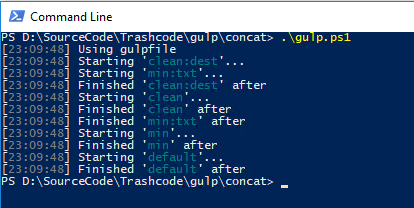
Looking in our destination folder we should see bigText.txt and it should have the contents of all the other files we put in our source directory and sub-directories.
Where to now?
At this point we really haven’t done that much with Gulp, but we have a good start to play with it and learn how to work with it. My next step will be to review the modules that are available and learn to work with them.
My goal is always to automate routine tasks and find ways to stream line workflows. I can see Gulp fitting in with PowerShell to help me accomplish those goals.
